Categories
Word Training

Using split screen in a Word document

If you often scroll through large Word documents to edit text, you could save yourself time by splitting the screen instead of scrolling backwards and forwards. This way, you can see two sections of your Word document on one screen – which can be useful, for example, if you are comparing your introduction to your concluding paragraph. Or cutting and pasting paragraphs to a different location in the document.

Using the Ribbon. The split screen button is found in View tab, in the Window options section.

split-screen-word-advanced
Use this handy button to split your screen and save yourself scrolling up and down a Word document.

You can split a document into two sections on one screen by applying horizontal sections.  This makes it much easier to cut and paste text from one section and apply it elsewhere in your document.

Your top and bottom pane work individually, and each pane with have its own ruler and scroll bars.


Alternative method. If you want to apply a split screen in a different way, there is a black line (like a minus sign) just above the vertical scroll bar.
split-screen-button-word-advanced I didn’t notice it before, it is that tiny, but once you spot it, you can quickly apply the split screen in a click and drag.  Your mouse will change to a double-headed arrow so you can then apply the split where you want it to be.  When you release the split box, there will be a horizontal split across the screen.

To remove the split screen
Hold your mouse over the split tab, then click and drag the tab all the way up or double-click the split box to refresh the screen to a single pane.

Compare two documents using a split screen
Make sure you have both of the files open.
Go to the view tab, and in the Window group, select the ‘View Side by Side’ button.

When you want to remove the ‘Side by Side’ view, click ‘View Side by Side’ in the Window group on the view tab, and your view will return to normal.

To get more out of this feature,  take a look at our Word advanced course.  For syllabus information see https://www.stl-training.co.uk/word-2010-advanced.php
Categories
Word Training

What is the difference between SmartArt and ClipArt in Word 2010?

This question is not quite eligible for to be a QI question but still worth knowing.

A document can look a bit bland without diagrams, and if you can’t get your point across quickly and easily, it can affect a business decision, project plan or sales analysis.

A graphic or diagram can be much easier for a reader to digest complex data compared to several paragraphs of text.

Clip Art 
Clip Art can be anything from a piece of stock photography, drawings or movie.
These can be used to illustrate a point or concept in your documents. 

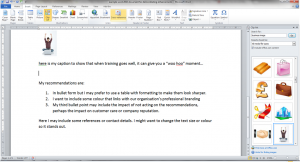
clipart menu word 2010
When I click on the Clip Art button, I get a menu of images. I can search for an image to match my term.

SmartArt
These graphics are more dynamic.  They can be uses to illustrate a process model,  organisational charts or even Venn diagrams.

Word 2010 gives a complete menu to choose from.  I love this tool, as it saves me trying to design models or diagrams and fretting with margins.  I can focus on adding the content to the image, and get my message across in my Word document.

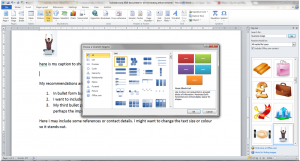
SmartArt-options-Word-2010
When I select Smart Art, I get categories of ready-made graphics to choose from, and add my own details to.

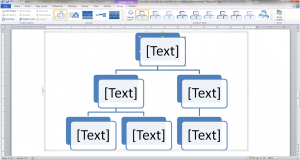
For example, if I need to add an organisational chart, I can select a ready made model and alter it to fit my needs.  I can edit it, resize it, and change the colour scheme, all with a few clicks.

Example of an organisational chart in Word 2010
After selecting the chart I want, Word 2010 automatically shows the Design tab for editing my chart.

Word advanced options include embedding videos, resizing images, rotating images and oh, so much more.  Make a start by experimenting by adding images and editing them, and keep on learning.