When I made the switch from Excel 2003 to Excel 2010, the Ribbon confused me and it still takes me a while to figure out which tab holds the functions I need. When I was on the intermediate Excel course the other week, I did notice that the trainer was talking about the buttons in different ways.
I felt it was time to devote a bit of time to learn about how to use the Ribbon more effectively including understanding the different types of commands.

Minimising the Ribbon I kept losing the Ribbon this week. Didn’t know why, but it seemed to minimise on a whim. That was until I learned that if I double-clicked on any tab, the Ribbon minimised. To get it back, I needed to double-click on any tab again. It is helpful to minimise the Ribbon when you want to see more rows (you can gain 5 more rows in the view if you minimise (not so helpful when you do this by accident and can’t work out what you did!)
Tip: the shortcut to minimise the ribbon or bring it back to its full size, use Control and F1.
What are the types of commands on the Ribbon? There are six main categories for commands: one-click, toggle, split buttons, drop-down and tick box. Categories can be mixed so it is useful to understand the basics to develop your Excel skills.
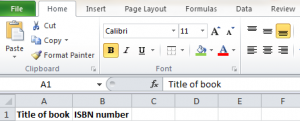
The does-what-it-says-one-click button. These perform a simple action or function when you click on it. For example, clicking on the text alignment button applies the format to the active cell. Other simple buttons in formatting include the Italic button, or bold, or increase or decrease font size buttons.

Toggle buttons, now this is pretty neat, and hadn’t spotted this until someone pointed it out to me. Excel tells me when I’ve applied this button to a cell, by changing the colour of the button, so I can toggle between applying and deselecting. This is incredibly helpful when I have different formats applied to cells and I need a reminder, or want to deselect the format quickly.

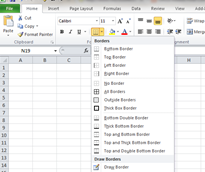
Drop down buttons have little arrows next to the button, reminding me that there are more options available. A good example is the Borders button, which offers me different borders to apply to the cells I have selected. Colour fill is another example, where I can click on the down arrow, select a colour and it is applied.

Split buttons are a hybrid of drop down buttons and one-click wonders. So you can click on the button itself and the action is applied. Click on the down arrow next to it, and more options are available and you can apply them from there. You still have the benefit of the button changing colour so you know when an action is applied.
Tick box buttons are on/off kind of buttons. A good example is in the View tab, where I can tick when I want to view gridlines, or show headings. Quick to apply or deselect.

If you can’t remember what a button does, hold your mouse over the icon, and Excel will give the description. If you use a button frequently, right click on it and add it to your Quick Access Toolbar, to save you from locating it on the ribbon each time.
The more familiar you get with the Ribbon, and the styles of buttons, the faster it will be to apply actions and functions. By understanding the Ribbon better, I can also speed up my learning on courses – knowing the terms and locations makes it easier to follow exercises. So I am focusing on understanding the commands and applying them so that I can move up to Excel VBA training soon. For more background on the different skills and levels offered, have a look at https://www.stl-training.co.uk/microsoft/excel-training-london.php
