Categories
Excel Training

Excel Charts – beginner’s guide to creating a pie chart

I’m new to the charting side of things…I’m used to staring at numbers on worksheets and trying to figure out what it all means…and admiring those around me who use charts…so mysterious…so professional looking…so much nicer than my rows of figures.

Charts make it so much easier to spot trends and analyse data – and I felt that the time had come to take a bite of that pie.  The idea of adding a chart filled me with a sense of dread…so I decided to  experiment with some basic charting to prove that it was possible to do, and all without the aid of several cups of coffee and a pep talk.

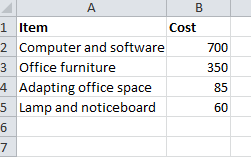
So here’s what I did.  As a simple example, I decided to look at how a pie chart could represent the cost of items in a range of categories for a (fictional) home office.
data-to-make-simple-chart-for-excel
Basic data for creating a small home office

I can show this data in a more visual way using a chart.  I can access charting options via the Insert ribbon. The first step is to decide on  the kind of chart I want, so I’m opting for a pie chart to make it easier to compare the proportional costs involved.

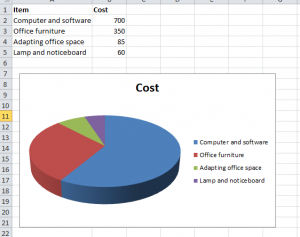
So, I select the data above and then go to the Insert ribbon, and click on the Pie Chart icon.   Because I’m feeling particularly brave, I’ve opted for the 3D pie chart…and it looks like this….
example-of-3d-piechart-cost-comparison-excel-training-intro-level
Here is my first attempt at using a 3D pie chart to show the costs involved in creating a home office.

It is a basic example, but it proved to me how easy it was to insert a chart – it took less than a minute to do.  Now…what can I chart next…


Categories
Excel Training

The Joy of Excel 2010 Templates

I love time-saving tips and templates are a great way of setting up new worksheets without the hard work of formatting, setting up formulas and trying to make things look good.  What I really want to do, is on get on with “the important stuff” of entering the data quickly, so that I can analyse the results and get the positive work outcomes I need.

Today’s mission, was to set up a basic time sheet for the different projects I am working on, and logging the time I spend on each one, so I can report back to each “client” on what I’ve done and how long it has taken.  I can then use this data to generate invoices, or project costings for example.

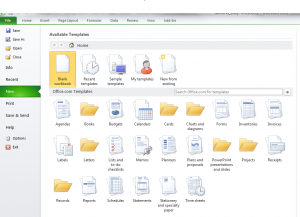
In Excel 2010, I selected File, New – and I am given a smorgasbord of options…this is where I can look through suggested ready-made templates.

Excel 2010 Templates selection
Screen shot of templates available in Excel 2010.

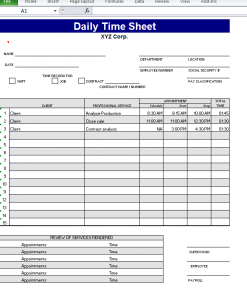
I chose “Time Sheets”, which gave me four options – from which I chose “Daily Time Sheet”, and downloaded it to my computer. It looks like this:

Template for WorkSheet, ready for editing
The template ready for editing to my requirements

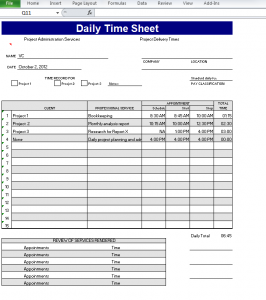
I then edited the sheet to show the titles and information I want to include and saved it.  Now I can easily add my client’s details, add a scheduled time for work and log what work was completed, for which client.  So now it looks like this:

Excel training templates 2010 to save time
My edited version of the timesheet so that the fields reflect what I need.

No messing with formulas, formatting or fuss…Job done!