Improve collaboration and save time
It is not uncommon with Excel to have multiple people requiring access to the same file. Whether the file in question is a sales report, marketing budget, or time-sheet for example. This is where the Share Workbook feature in Excel comes in handy, here we’ll look at how to share files in Excel and things to watch out for.
The big incentive for sharing an Excel file amongst people is that there is just a single version in use. Not taking this approach entails all sorts of challenges, from having to manage multiple (and ever changing) versions of the same file through to organising how to merge all the data into a single file. By sharing, everyone is on the same page/workbook!
Step 1 Create or open an existing spreadsheet that you wish to share.
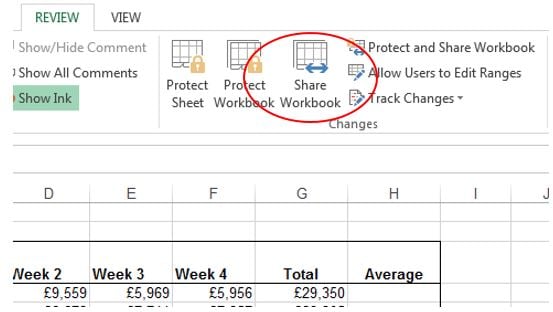
Step 2 Once open, go to the Review tab and select the Share Workbook.

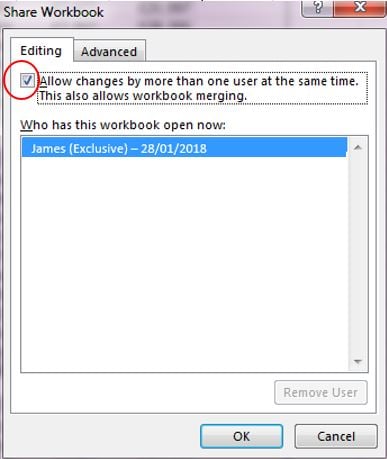
Step 3 Now the Share Workbook dialogue box will be open. Make sure the Editing tab is open and then click on the box to “Allow changes by more than one user at the same time” (this is where you will also be able to view who else is using the shared file). Finally click OK to save the changes.
Step 4 The file then needs to be saved to a location that others will be able to access. This could be a shared folder, network drive, or even a OneDrive (for Excel 2013 users).
About advanced sharing features
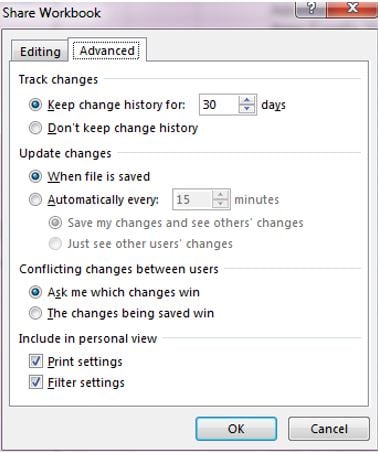
You may have noticed the Advanced tab on the above Share Workbook dialogue box. Here is a quick overview on what these advanced features do:
Track changes: If you wish to track revisions then select the Keep Change History option. The fewer days that you select the smaller the size of the change log.
Update changes: If the Excel file in question is in regular use it makes sense to set up an automatic save. You can even be notified of what changes are being saved.
Conflicting changes between users: Take an instance where the same cell has been changed by two users, you can either have the option to decide which change gets saved or simply set it so that only saved changes have final say.
Include in personal view: An option to include any set filter and print views that other users may have applied.
Sharing does limit Excel features:
| When sharing you can: | When sharing you can’t: |
|---|---|
| Insert columns/rows | Create a table |
| View existing charts | Can’t create new charts |
| Use existing conditional formating but not edit | Merge cells or split merged cells |
| View existing Macros with limitations | Group or outline data |
The Share Workbook feature in Excel is a really useful way to easily collaborate between different users and not have the headache of managing multiple file versions. Yes it does need some consideration in terms of certain limitations of Excel features and ensuring everyone can access the file. It may not be a bad idea to actually keep a spare sheet in the workbook with some sharing guidelines for all users.
With Excel 2013 the options to share are even more varied considering that you can share a file for access across multiple platforms and devices (such as iPads).
More resources on how to share files in Excel
How to share a file in Excel 2010.
Read more
How Getting Together Is Now Even Easier With Excel.
Read more
Use a shared workbook to collaborate.
Read more

