You can add an extra “huzzah” to your presentations using this Powerpoint advanced technique.
Adding narration to a presentation can be used to add variety and interest to your presentation. If you can’t be there to give the presentation or if you suffer from nerves, you can record your narration.
The bonus of using narration is that you can practise and re-record the narration until you are confident that it has the tone you want. It can help with the flow of your narrative, if you have your presentation complete, and you have a clear idea of what you want to say. Script it if you find that helps you get the content and tone sounding right for you.
You can record your narration as you go through your whole presentation. You don’t have to get it perfect each time, as you can stop, pause and carry on recording.
Get the basics in place before you start though…check your your microphone is set up and working.
- Go to the Slide Show tab
- Go to the Set Up group of icons and click on Record Slide Show

- You have the option to record from a particular slide or right from the beginning of your presentation. To start from the beginning of your presentation, click on Record from the beginning.
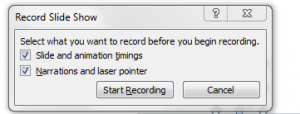
- Powerpoint will give you the option to choose from the narration and laser pointer or slide and animation timings. Click on the option that suits you.

- Ready to go? Now click Start Recording.
- If you need to pause at any time, you can hit the pause button on the shortcut menu that appears in the corner. And then, when you are ready to carry on, just click Resume Recording.
- When you’ve finished your recording, use the right click on the slide and select End Show. Powerpoint has saved your recording, complete with the timings for each slide.
Our one-day Powerpoint advanced training includes adding sound and narration to your presentation. This is part of a range of advanced skills included in Using Multimedia in Presentations. Find out more information on the course on https://www.stl-training.co.uk/powerpoint-2010-advanced.php

