Categories
Application Excel Training Microsoft Microsoft Office Technology

The Magic of Power Query

One word That describes Power Query in Excel – MAGIC! 

 Power Query will completely change the way you work in Excel! For most Excel users, Power Query could be the tool that reduces time spent in Excel dramatically.

Power Query could also minimise the use of VBA coding in Excel. It can be seen as a machine. Once the “machine” is built, it will continuously repeat the tasks for new data added to Excel.

It is a much easier alternative for automating processes than VBA programming because it does not necessitate coding. In this article, we will explore the magic of Power Query.

The Magic of Power Query

key features of Power Query

You can: 

  • Connect live to an external data source
  • Structure internal and external data
  • Clean, merge, append, and group internal and external data
  • Automate tasks
  • Transfer data from the query connection to the Excel data model
Connecting live to an external data source 

The Magic of Power Query

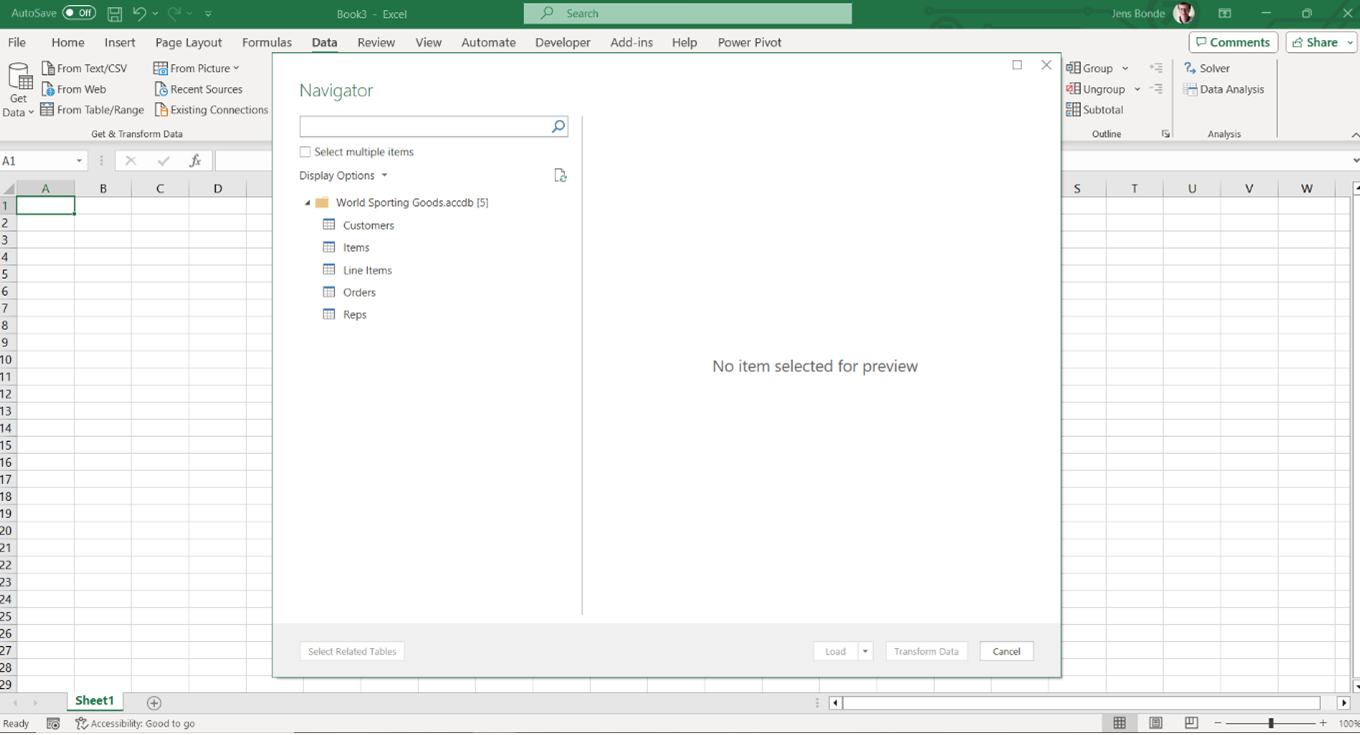
The tools to connect to external data are found on the Data tab in Excel, in the Get & Transform Data group. You can connect to any live data if you have legal access to it. You may need to get help from your IT department to connect to your source, depending on what your source is. When you have created the connection, you can create your reports, analyses, or dashboards and they will auto-update when new data is added to the source. 

You can also connect to folders, which can be extremely useful if you receive your data from clients. If you connect Power Query to a folder, drop any new data into that folder and your report, dashboard, or analysis will update, including the new data. 

Structure internal and external data 

Many Excel users struggle with source data that is structured incorrectly. This makes working in Excel much more time-consuming. Excel prefers lists, and all source data should be in a well-structured list. Power Query can restructure your data sets. When you have set up the query, the “machine” will restructure any newly added data in future.

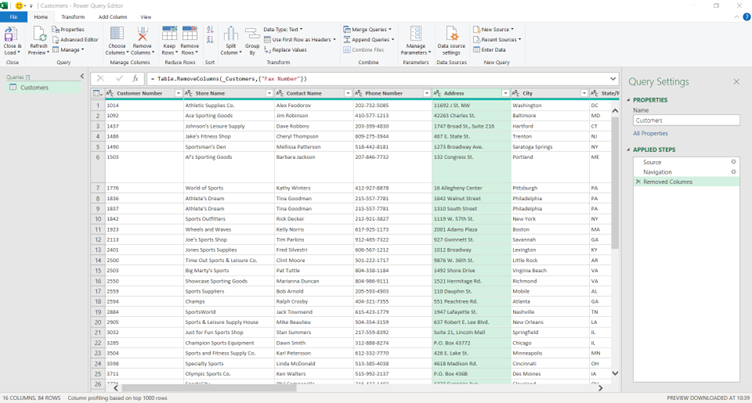
 The Power Query Editor

The Magic of Power Query

Clean, merge, append, and group internal and external data 

If your data contains US dates, extra spaces, unprintable characters, incorrect spellings, empty rows or columns, incorrect formats, or hundreds of other issues, Power Query is the right tool for you. 

Power Query can also merge any number of tables. Say goodbye to complicated and memory-heavy lookup and reference functions. 

Connect to many lists and turn them all into one list by using the Append option in Power Query. 

The Group Data tool in Power Query can replace the use of Pivot Tables and the Subtotal tool, but is also particularly useful as a part of the Merge Data tool which generates related keys between the tables. 

All tools in Power Query are available both for external and internal data. 

Automate tasks 

Power Query works in much the same way as the macro recorder in Excel. The query records the steps you are doing in your data sets and writes code in a language called Power Query M.

Code example: 

The Magic of Power Query

One of the differences between a macro and steps in Power Query is how the code gets executed. Recorded macros will only run with user input, so you need to execute the code manually. Power Query M steps will automatically execute every time there is a task to do. 

Transfer data from the query connection to the Excel data model 

Excel has a limit of 1,048,576 rows. However, the number of rows you can add to the memory of the Data Model is almost limitless. Few Excel users are aware of a data model in Excel called Power Pivot. Not only can it store billions of records, but the compression technology Microsoft has developed for this tool is outstanding.

If you are working with huge data sets, the combination of Power Query and Power Pivot is the ultimate winner. You can connect to huge data sets. Then you can clean, structure, merge and append your data in Power Query. Afterwards, you can transfer the data to the Excel data model and relate the data sets. 

Power Query – THe Pros and Cons 

To be honest, there are really only pros. 

Any Excel user above a basic level should explore this tool; it will change how you use Excel. For most users, it will also have a significant impact on the time spent in Excel. Such is the magic of Power Query.

Pros: 

  • Positively impacts the efficiency of Excel tasks 
  • Removes boring time-consuming repetitive tasks 
  • Automates tasks without complicated VBA codes 
  • Makes other tasks simpler because data quality and structure will be improved 

Cons: 

N/A 

Further Reading:

Want to learn more about Power Query?

Have a look at some of our other free resources on the topic:
Solve Data Problems in Excel with Power Query – blog

Categories
Application Microsoft Technology

How to use Live Events efficiently in Microsoft Teams

Using Live Events efficiently in Microsoft Teams

Microsoft Teams meetings are great for a few people to meet, but for a larger scale online webinar, the option of a Live event will be more efficient. This blog discusses how to use Live Events efficiently in Microsoft Teams. The organisers can line up content for a more seamless experience, changing smoothly from one presenter to another. Communicate with each other behind the scenes before the event goes live to discuss any last-minute changes to the line-up or update the presentations being used. Add to this the opportunity to have up to 10,000 attendees at each event and for it to last for up to 4 hours and you have a brilliant webinar option in Microsoft Teams. Depending on your setup, there may be the option to have more attendees for a longer duration.

How to use Live Events efficiently in Microsoft Teams
Teams Meeting
Creating a live event

Live events can only be set up from Microsoft Teams, not from Outlook.

  1. Choose calendar from the left pane
  2. From the drop down alongside New Meeting, select Live Event
  3. Add the information about the live event
  4. Choose who to invite as presenters to the event. These the people running and presenting the webinar. Each person invited can be set to be a presenter or a producer. Their roles are different and are detailed at the end of this blog
  5. Set the live event permissions to either People and groups, Organisation-wide or Public
  6. Choose how the live event will be produced including whether a recording will be available after the event for the attendees, whether an attendee engagement report will be produced to monitor who attended and whether attendees will be able to pop their questions in a Q&A
  7. Click on Schedule to schedule the meeting
  8. Invite attendees by clicking on Get Attendee Link and sharing or sending it
  9. Click on Close
Joining the webinar as a producer or presenter

Shortly before the webinar is due to take place, the producers and presenters will join the live event to ensure everything is working correctly. They can join the event from the calendar event in either Teams or Outlook.

  1. Double-click on the calendar event to open it
  2. Click on Join live event or Join depending on whether you are in a Teams or Outlook meeting
  3. Do not forward on the invite as only invites sent directly from the meeting organiser that will work
  4. Click on Join Now
  5. A producer will come straight into the meeting while a presenter may be required to wait in the lobby.
  6. The event is currently pre-live. This means that none of the attendees can see or hear what is happening. This gives the producers and presenters the time to organise the event
  7. All the producers and presenters will be listed at the bottom of the screen. If wish to add them to the queue, simply click on them
  8. Send live adds this to the right screen too. At this point the event is still not live
Ready, Steady, Go Live!
  1. Click Start to start the live event
  2. Click Continue if you are sure you want to start the live event
  3. There is a 10 to 20 second delay between the presentation and what the attendees see.
  4. While someone is presenting, the producer can line up the next presenter ready to go live
  5. Click End to end the live meeting for participants. It can’t be restarted
  6. Click End live event to confirm the event is over
  7. The producers and presenters are still in the meeting at this time and can discuss the event
  8. Click Leave to close the event completely

NOTE: Some of these options will only be applicable to the producers.

Joining the webinar as an attendee

The attendees will have received a meeting invite from the meeting organiser.

  1. Click on Join live event if opening the invite from Outlook or Join if joining from Teams
  2. If the live event has not started, the holding screen will appear
  3. If the event has started, the attendee will enter the meeting

Attendees can only communicate via the Q&A window if this has been enabled.

Attendees can access the recording of the live event later by returning to the original invite if this has been enabled.

People involved with a live event

Let’s summarise the four user roles involved in a Teams Live Event

  • The organiser does not need to be in the event unless they are also a producer or presenter. They do all the event setup, invite attendees, configure event options and generate any reports after the event.
  • The producer facilitates the event, lining people up to go live, starting and stopping the event and may also keep an eye on the Q&A and relay questions back to the presenter.  They can also present part of the webinar.

If you are planning on running an event like this I would suggest a dry run, making sure everyone knows what their responsibilities are, particularly while the event is live.  There are lots of benefits for larger events using this rather than a standard team meeting.  It’s all about using the right tools for the job.

This, then, explained how to use Live Events efficiently in Microsoft Teams